The power supplies issue
What is the issue?
Never use an old Atari power supply without checking its condition first. Even to test for 3 seconds that the computer's "Power" light is on. Even to test that an image appears on the screen. You should never use one without precautions. It could destroy the computer due to a power surge, or catch fire or explode.
Overvoltage can fry chips instantly.
Undervoltage may cause erratic behavior and data corruption.
All these products were designed in the 1980s for a life span of 3 years, 5 years... but certainly not 40 years. Power supplies, in particular, can have problems with components that have aged. Typically, this can result in an output voltage well outside the original specifications: for example, 11 volts instead of 5 volts, which would be fatal to a computer.
Show stoppers
First of all, if an electrical cable is damaged, exposed, or has been tampered with/fixed with adhesive tape, then STOP! If the power supply is covered in dust or mud, if the plastic cover is broken, if screws are loose in the power supply, if the power supply makes noise when shaken, if the power supply smells burnt or if anything else seems wrong, then STOP! Take the power supply to an electrical professional for repair or take it to the recycling centre for environmentally sound disposal.
Finding a replacement model is not difficult. Some websites sell excellent new power supplies, with modern technology, for Atari computers.
Recommendations
These recommendations apply to all Atari power supplies: both for computers and peripherals. Consult the FAQ (section: "What are the power requirements for my Atari components?") to check two essential things:
- Check that you have the right power supply: the right model for the right device. If it is not an original Atari model but a clone, then be suspicious
- Check with a multimeter that this power supply produces the expected 5 Volts, 9 Volts, 20 Volts (or other)
Advice for testing
This is common sense advice but I think it is best to be clear:
- Do your tests in a ventilated room, with no one else in the room and away from any flammable substances
- In case of trouble, you must be able to pull the plug very quickly or cut the electrical circuit to that plug
- Do not stand too close to the power supply to be tested. If it explodes or catches fire, it is better not to have your nose above it
- Place the power supply flat on a clean, stable table or work surface, free of clutter
- Connect the power supply to the mains WITHOUT connecting it to the Atari computer/device
- Wait a while. Does the power supply become abnormally hot to the touch? Suspicious smell? Strange noises? Smoke? If so, unplug it immediately and do not use it. If not, continue
- After a few minutes of observation, test the output voltages with your voltmeter. Do they correspond to the specifications found in the FAQ? 5.5 Volts instead of 5 Volt is perfectly normal. 11 volts instead of 5 volts is not ok at all
- If all goes well, you can use this power supply
Start all over again periodically
Do not take these tests for granted forever. After several months without using them, it is safer to re-test the power supplies you want to use. The storage conditions have a great influence.
General rules to follow
Test the power supply (see above)
Never, ever use a power supply you didn't test first (see above). Atari 8-bit computers are very reliable in general but this error — entirely the fault of the user — could be fatal in as little as 3 seconds.
Atari system start-up order
Always turn on the computer last.
Always turn off the computer first.
Instant automatic turn off
On an Atari 400/800, opening the cartridge door (compartment, lid) while the computer is on instantly turns it off. You might lose whatever you were doing if you open it inadvertently.
As a matter of fact, unlike all the subsequent models, the Atari 400 & 800 have two physical switches: a regular "Power On/Off" switch and a "cartridge door (compartment, lid) opening sensor", which cuts power when the cartridge door (compartment, lid) is open.
Minimum RAM
As a general rule, the Atari 400/800 Operating System requires a minimum of 8 KiB RAM memory to operate. This is the absolute minimum. Even Atari BASIC itself requires 8 KiB to function. What's more, with only 8 KiB, it's impossible to use the high-resolution graphics mode (GRAPHICS 8) or the floppy disk drives.
By design, all the following XL and XE computers have enough RAM memory to operate.
Minimum RAM - Atari 400
The Atari 400 was delivered with 8 KiB of RAM memory (1979-1981) then 16 KiB (1981-1983), not directly accessible to the user. In 1983 an extension to 48 KiB was offered with the "Atari 400 Home Computer 48K RAM Expansion Kit", requiring the computer to be dismantled.
So there's nothing special to check for the Atari 400: it's bound to have at least 8 KiB of RAM memory.
Minimum RAM - Atari 800
The Atari 800 was delivered with a quantity of RAM memory directly accessible to the user in the form of plug-in modules; a quantity of RAM that has constantly increased: 8 KiB (1x CX852 8K Memory Module), then 16 KiB (1x CX853 16K Memory Module) then 48 KiB (3x CX853 16K Memory Module). So, a check is in order: are some RAM plug-in modules correctly installed?
When you open the cartridge door (compartment, lid), you should find at minima: starting from the slots closest to the keyboard and moving towards the slots at the back of the computer:
- First, the "LEFT CARTRIDGE" & the "RIGHT CARTRIDGE" slots.
- Then, a 10K ROM module containing the OS: CX801 (NTSC) or CX801-P (PAL or PERITEL).
- Then, a CX852 8K Memory Module.
If you have more than 8 KiB of RAM memory, look carefully at the pictograms printed on each module, which indicates how to arrange them and which slots to plug them into, for each of the 8, 16, 24, 32, 40 or 48 KiB configurations.

If no RAM module is installed or if the requested arrangement is not respected, the Atari 800 will not work: a minimum of 8 KiB of RAM memory, installed in the first RAM memory slot is required.
RAM failure?
RAM failure symptoms may include system instability, random crashes, garbled graphics, and failed program loads. Using diagnostic cartridges or memory testers can help isolate faulty RAM chips.
If you have an XL or XE computer, simply run the "Memory" test in the "Self-Test" program
Atari 1200XL trapped in Self-Test
On an Atari 1200XL, a jumper on the motherboard can force the computer to run the "Self-Test" program directly, ignoring cartridges, cassette tapes and diskettes. If your 1200XL stubbornly refuses to launch anything and systematically shows you the "Self-Test", it is not necessarily because a problem has been detected, it may simply be due to this jumper on the motherboard. Read the "OS Manual XL addendum" for details.
SECAM Atari 800XL trapped in monochrome mode
On a SECAM Atari 800XL, if the image produced by the computer is invariably monochrome, switch the colour/black & white switch which is accessible, on the back of the computer, in the small "Switch box" hole.
Proper cartridge use?
Do not insert/remove a cartridge while the computer is on.
Yes, some versions of the OS support this and launch an immediate reboot or wait for you to press the [RESET] key. But that's no reason to do it. In fact, just don't. Switch off the computer before changing the cartridge.
Use the latest Atari BASIC
If you intend to use Atari BASIC, make sure you are using "Revision C", the latest version which fixes the bugs found in the previous versions.
Unfortunately, the revision number — REV. A, REV. B or REV. C — isn't shown on the cartridge label, nor on the screen when Atari BASIC starts up. An expert might be able to identify the revision by the "look" of the cartridge, but I suggest a very simple test.
In Atari BASIC, type the instruction PRINT PEEK(43234).
REV. A returns a value of 162, REV. B returns 96, and REV. C returns 234.
If your 400/800 comes equipped with an Atari BASIC REV. A cartridge, get a REV. C cartridge.
If your 600XL/800XL has the embedded Atari BASIC REV. B, get a REV. C cartridge to override the embedded version.
Proper colours adjustment?
The colours of the images are correctly adjusted in the factory during the manufacturing process. However, if you find that the text in Atari BASIC, for example, is not on a blue background but on pink or another colour, then it is possible that the colour setting has been changed by a previous owner. Almost all Atari computers have a colour potentiometer that can be easily{1} accessed externally — accessible without opening the chassis.
Turn the computer over and look carefully at all the holes. Most of them are for screws (especially on the edges), but one of the holes actually has a knob that can be turned with a flathead screwdriver. Just turn it slightly to the right or left to adjust the colours. Do not force it. Take it easy, and turn only a little.
{1} There are 3 exceptions:
On the Atari 400, this setting, this colour pot is on the back of the computer, almost hidden but accessible through the ventilation grille.
On the Atari 800, this setting, this colour pot also exists but is not available outside the chassis. You have to open the computer to access it at the rear of the memory expansion compartment.
On the Atari XEgs (Atari XE Game System), this setting, this colour pot also exists but is not available outside the chassis. You have to open the computer to access it on the PCB.
About the SIO chain
The computer's SIO (Serial Input Output) port is the most common way to connect peripherals to an Atari computer. It is not the only way, though. It is also possible to connect some peripherals to the PBI/ECI port, to an Atari 850 interface, to the cartridge port, to the joystick ports, etc.
SIO-based peripherals are connected in a chain, in cascade, one over the other. A new peripheral simply plugs into the last one in the chain. Most peripherals have two SIO ports, to connect to the next and previous one in the SIO chain. If your device has two SIO ports, use whichever one you want. There is no "In" & "Out". There is no "to computer" SIO port and no "to end of SIO chain" SIO port.
There is no official "right or wrong" order for putting SIO peripherals in an SIO chain, just force of habit. It is common practice to plug the floppy disk drive #1 (see below) closest to the computer, then possibly the other floppy disk drives, then the printer(s), and finally — last in the chain — the cassette tape player/recorder.
If you have an Atari 410 cassette tape player/recorder, you won't have a choice: it has only a single SIO port, so it must be placed at the very end of the chain. If you have any other model of Atari cassette tape player/recorder, it will have two SIO ports, so you can position it wherever you like.
Again, this is just a habit, often because the cassette tape player/recorder is not much used when you have one or more floppy disk drives. However, if you have systematic problems reading or writing with the cassette tape player/recorder, move it closer to the computer in the SIO chain. Also, check that the cable is not positioned too close to any potential sources of electromagnetic interference.

Two remarks about Atari floppy disk drives:
- Atari floppy disk drives are the only peripherals equipped with a physical selector switch, allowing you to assign them a number on the SIO chain. For example, "#1" to drive "D1:", "#2" to drive "D2:", and so on. As a result, the other Atari peripherals can only exist (and be powered on) in a single instance on the SIO chain.
- The diagram above shows Atari 810 and 815 floppy disk drives on the SIO chain. But of course, all these drives must each have a unique number on the SIO chain. It is therefore impossible, for example, to have an Atari 810 floppy disk drive set to "#1" and an Atari 815 dual-drive unit set to "#1" and "#2", both powered on at the same time. For the same reason, you cannot have two Atari 810 floppy disk drives both configured as "#1" and powered on simultaneously.
See the section "Floppy disk drives" below for full details on Atari floppy disk drives and their "#1", "#2", etc. numbering scheme.
The signal (data/audio) continues to pass through in the SIO chain without problems, even when some SIO-based peripherals in the chain are not switched on (powered on). So, for instance, you can leave your SIO-based printer in the SIO chain all the time, with other SIO-based peripherals before and after it, and only turn it on when you really need to print. In other words, you do not need to constantly power on all the peripherals in the SIO chain so that the signal (data/audio) can reach the last one.
One last point: a single Atari 850 interface is permitted on the SIO chain. This is because the numbering of the serial devices from "R1:" to "R4:" (RS232C) is hard‑coded into the 850 interface. It is therefore impossible to connect a second Atari 850 interface and assign "R5:" to "R8:" to additional modems, for example. The numbering scheme flexibility is only offered for Atari floppy disk drives.
Joysticks and other controllers
Original joysticks and other controllers can be plugged in and unplugged at any time in any joystick ports of any Atari 8-bit computer. The Operating System tries to read them all the time. This means you can connect or disconnect any of the following Atari controllers at any time while the computer is running or while you are playing a game.
Original Atari models featured a 9-pin DB9 connector (socket, female), designed to be plugged into an Atari 8-bit computer joystick port (plug, male).
Example: Atari CX-40 Joystick.
Newer Atari models have a reference that includes the "+" symbol, and most importantly, they're fitted with a USB connector. As a result, they CANNOT be connected directly to an Atari 8-bit computer. They're intended for modern recreations such as "The400" or your everyday computer.
Example: Atari CX-40+ Joystick.
There is an exception: some wireless models are offered with two dongles: DB9 and USB. Consequently, they can be used on ANY computer. I have in mind the coloured versions, matching the Pac-Man theme (5 different joysticks).
Example: Atari CX-40+ Wireless Joystick: Ghost Edition, Blinky (Red).
Last but not least, apart from the CX85 Numerical Keypad, which requires a driver for the 0-9 keys to be recognised, all other standard controllers are detected by the operating system and require no changes or additional software to be recognised and used straight away.
Joysticks
- CX10 Joystick Controller
- CX24 Pro-Line Joystick / Super Controller / Deluxe Joystick
- CX40 Joystick Controller / Standard Joystick
- CX40+ Joystick Controller / Standard Joystick (USB version)
- CX40+ Wireless Joystick Controller / Standard Joystick (with DB9 and USB dongle)
- CX42 Remote Control Wireless Joysticks
- CX43 Space Age Joystick
- CX78 Joypad Controller
- CX78+ Joypad Controller (2024 USB version)
- Track & Field Arcade Controller (bundle with RX8069 Track & Field cartridge)
Paddle-type
- CX20 Driving Controller (One controller attached to one controller plug)
- CX30 Paddle Controllers (Two controllers attach to one controller plug)
- CX30+ Paddle Controllers (USB version, two controllers attach to one controller plug)
Trak-Ball
- CX22 Trak-Ball controller (early, Joystick emulation only)
- CX22 Trak-Ball controller (most units, Joystick emulation or true Trackball operation)
- CX80 Trak-Ball controller (Joystick emulation or true Trackball operation)
Light Pen or gun
- CX70 Light Pen
- CX75 Light Pen
- XG-1 Light Gun
Touch Tablet
- CX77 Touch Tablet
Miscellenous
- CX21 Video Touch Pad
- CX23 Kid's Controller
- CX50 Keyboard Controllers
- CX85 Numerical Keypad
This also works for Atari 8-bit compatible controllers, of course.
Magnetic storage media
Magnetic storage media
In computer terms, media usually refers to magnetic storage media. These are diskettes, cassette tapes, or stringy floppies (non available for Atari 8-bit computers).
An oxide material suspended in a resin binder is coated on a plastic substrate to form a smooth layer. The oxide material can be magnetized during the writing stage which polarizes the material magnetically. When the read/write head is passed over the spot again (in the "read" mode), the head picks up the polarization switches and interprets them as highs or lows (0s or 1s).
Magnetic media will retain data for many years if they are not subjected to intense magnetic fields, such as from a speaker magnet or motor, but they will eventually wear down from abrasion and thus should be backed up.
Diskette
A floppy disk or floppy diskette (casually referred to as a floppy, or a diskette) is an obsolescent type of disk storage composed of a thin and flexible disk of a magnetic storage medium in a square or nearly square plastic enclosure lined with a fabric that removes dust particles from the spinning disk. Diskettes store digital data which can be read and written when the disk is inserted into a floppy disk drive connected to or inside a computer or other device.
The first diskettes, invented and made by IBM, had a disk diameter of 8" (20,32 cm). Subsequently, the 5"¼ (12,7 cm) and then the 3"½ (7,62 cm) became a ubiquitous form of data storage and transfer into the first years of the 21st century.
Diskettes were so common in late 20th century culture that many electronic and software programs continue to use save icons that look like diskettes well into the 21st century, as a form of skeuomorphic design.
Cassette tape
The Compact Cassette or Musicassette , also commonly called the tape cassette, cassette tape, audio cassette, or simply tape or cassette, is an analog magnetic tape recording format for audio recording and playback. Invented by Lou Ottens and his team at the Dutch company Philips in 1963, Compact Cassettes come in two forms, either already containing content as a prerecorded cassette (Musicassette, aka MC), or as a fully recordable "blank" cassette. Both forms have two sides and are reversible by the user.
Its uses have ranged from portable audio to home recording to data storage for early microcomputers. Most home computers of the late 1970s and early 1980s could use cassettes for data storage as a cheaper alternative to diskettes. Even the first version of the IBM PC of 1981 had a cassette port and a command in its ROM BASIC programming language to use it.
The tape speed never varies. It is a characteristic of the cassette tape format. The tape moves past the playback head at 1+7⁄8 inches per second (4.76 cm/s), the speed being a continuation of the increasingly slower speed series in open-reel machines operating at 30, 15, 7+1⁄2, or 3+3⁄4 inches per second. Each new speed is calculated on the previous one, divided by 2. The tape speed of a cassette tape has therefore not been chosen at random: it is directly linked to the speed of the open-reel machines.
Sources: Wikipedia articles about Diskettes & Cassette tape
5"¼ Diskettes
Typical commercial product.
This is a box of Kodak diskettes, made in Ireland and sold in Europe: (soft sectored) 5"¼ diskette, "Double Sided/Double Density" (2S/2D, 48 TPI).
The packaging is in English, French, German and Spanish.


Vocabulary
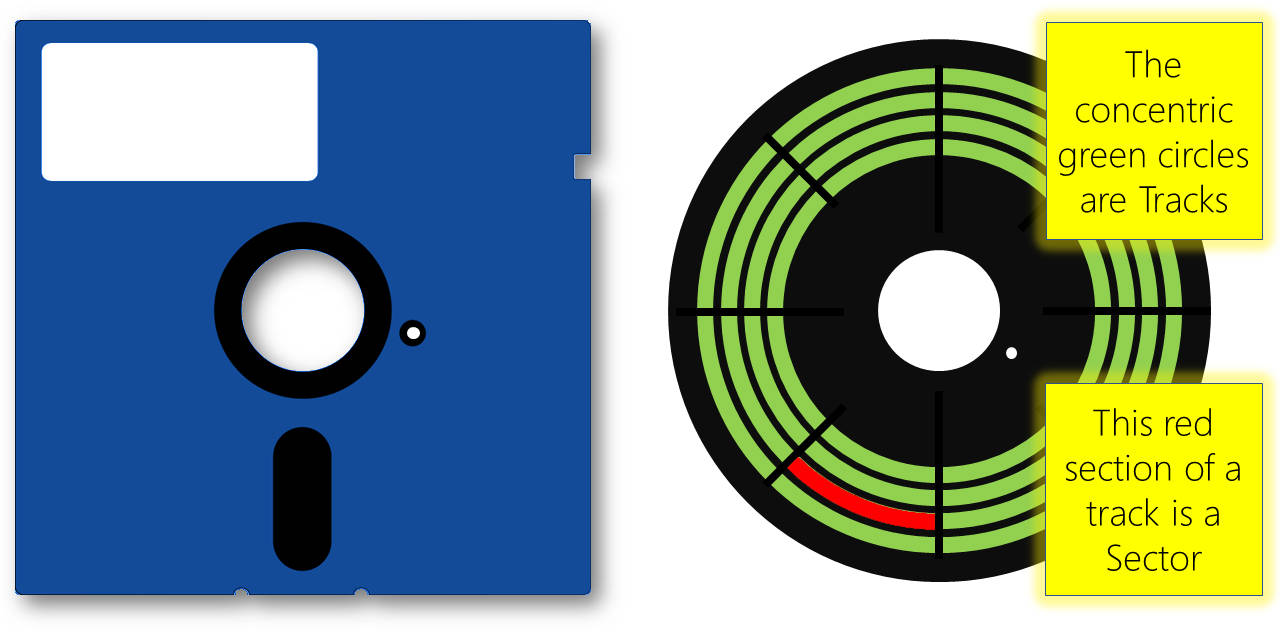
The concentric rings of data on a diskette which contain formatted sections of polarized magnetic regions are called "Tracks".
Then, each track is divided into "Sectors".

Hard- or soft-sectored?
The 5"¼ diskettes come in hard-sectored (rare) or soft-sectored (more common) form:
- Hard-sectored diskettes — Some floppy disk drives (not the Atari types) use a hard sector format. These diskettes are identified by the 13 or 16 holes punched around the center hub which are visible through the tiny timing hole in the diskette cover. These holes are used to mark sectors as they are read by a light source shining through the holes.
- Soft-sectored diskettes — Atari floppy disk drives use soft sectored diskettes. This means that the sectors are divided by timing marks written on the medium during the formatting process as opposed to using holes punched in the medium. Atari floppy disk drives can use hard sectored diskette, but they will be used as soft sectored: the 13 or 16 tiny timing holes will be ignored.
All the floppy disk drives produced by Atari use 5"¼ (soft sectored) diskettes.
40-track diskettes
Atari has chosen to format all its diskettes with 40 tracks and an identical number of sectors by track — whether the track is close to the centre or close to the outer edge. However, it is obvious that the geometry of a diskette allows for more rational and optimal use: a track located towards the outer edge is much longer than a track located towards the centre. So, tracks located towards the outer edge can accommodate much more sectors without any problem than tracks located near the centre. Deciding that ALL sectors would have 40 tracks is by no means optimal. This is a very unambitious choice for the time.
What's more, the spacing between the tracks is very large by industry standards.
The disadvantage is obviously the limited capacity of Atari diskettes, compared to Apple or Commodore diskettes at the same time.
The advantage is that Atari floppy disk drives can handle poor quality diskettes without difficulty.
| Number of diskette sides used |
Number of tracks per side |
Number of sectors per track |
Number of bytes per sector |
Total capacity when formatted, in bytes |
Known as... |
|---|---|---|---|---|---|
| 1 | 40 | 18 | 128 | 92,160 | 90 KiB Single Sided/Single Density |
| 1 | 40 | 26 | 128 | 133,120 | 130 KiB Single Sided/Enhanced Density |
| 1 | 40 | 18 | 256 | 184,320 | 180 KiB Single Sided/Double Density |
| 2 | 40 | 18 | 256 | 368,640 | 360 KiB Double Sided/Double Density |
Which format for which floppy disk drive?
A diskette formatted as "90 KiB Single Sided/Single Density" is a universal format that can be read by all Atari floppy disk drives. Almost all (yes, there are notable exceptions) commercial softwares for Atari 8-bit computers use this format (or a modified version with protection), in order to be readable on any configuration, including configurations with the Atari 810 floppy disk drive.
| This Atari floppy disk drive... |
...can use that type of diskettes (formatted as) |
|---|---|
| Atari 810 |
90 KiB Single Sided/Single Density diskette 130 KiB Single Sided/Enhanced Density diskette — but only the 1st 90 KiB on the diskette, provided that it was formatted with Atari DOS 2.5 (see below) |
| Atari 1050{2} |
90 KiB Single Sided/Single Density diskette 130 KiB Single Sided/Enhanced Density diskette |
| Atari XF551 |
90 KiB Single Sided/Single Density diskette 130 KiB Single Sided/Enhanced Density diskette 180 KiB Single Sided/Double Density diskette 360 KiB Double Sided/Double Density diskette |
{2} The Atari 1050 floppy disk drive is not a genuine "double density" drive — i.e. supporting 180 KiB. Atari has had trouble finding a name for this strange configuration, referring to it as "dual density", sometimes as "enhanced density", sometimes as "double density" (misleading). The irony is that the physical floppy disk drive model (from Tandon or WST) installed in the 1050s supports true "double density" (180 KiB) without any problem, but not the controller card installed in the chassis. However, the upgrade is not that difficult or expensive.
Which type of blank diskettes to buy?
If you want to buy blank diskettes, then, for simplicity and convenience, buy:
- 5"¼ "Single Sided/Double Density" (1S/2D, 48 TPI) diskettes that you will be able to use with all the Atari floppy disk drives: Atari 810, 1050, XF551
- 5"¼ "Double Sided/Double Density" (2S/2D, 48 TPI) diskettes if you need to use the 360 KiB format, because it is the only one requiring a Double Sided diskette
Do not buy, and do not use HD "Double Sided/High Density" (2S/HD) 5"¼ diskettes in Atari floppy disk drives.
The notch: visible or not
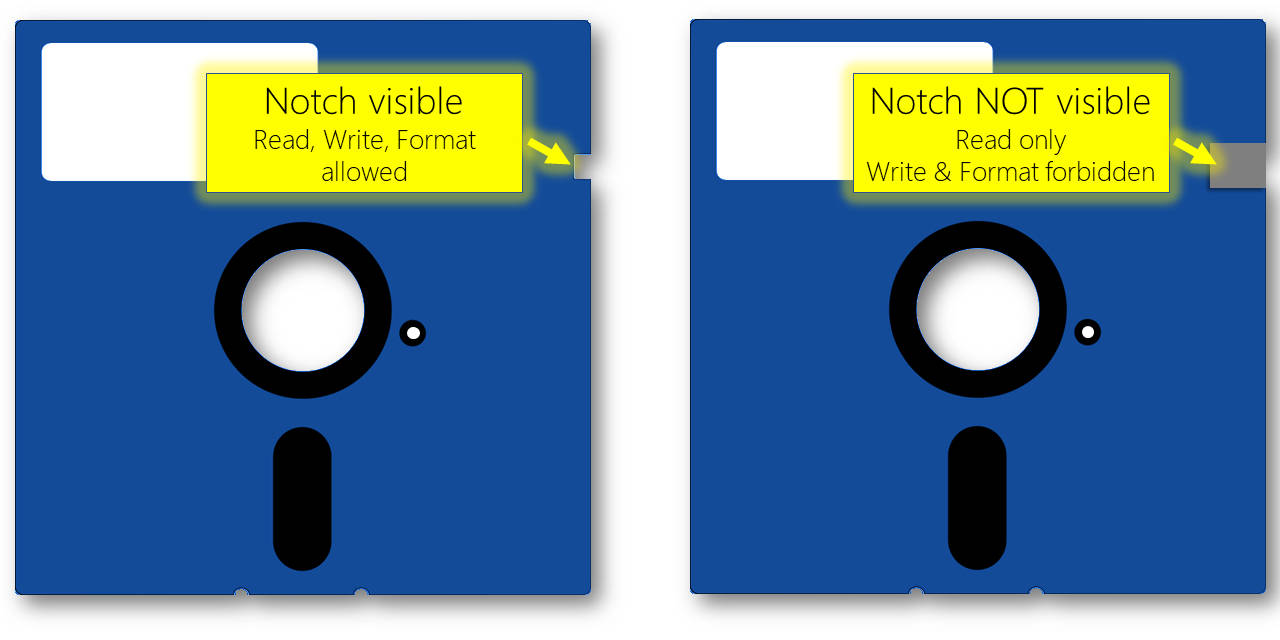
When the notch is visible (not covered), then the light from the sensor in the floppy disk drive will pass, signalling to the floppy disk drive that it has permission to write to the diskette.
You can then: read the diskette, write to the diskette (create, update, rename, lock/unlock or delete a file) and format the diskette.
When the notch is not visible (not cut out or not covered with a self-adhesive rectangular black or aluminium label), then the light from the sensor in the floppy disk drive will not pass, signalling to the floppy disk drive that it is forbidden to write to the diskette.
You can then: read the diskette and that's it! Writing to or formatting the diskette is physically impossible.
The notch: cutting a 2nd one...
A remark about "Single Sided" diskettes: In the 1980s, it was common practice to make a 2nd notch in the side of the floppy disk (the "Write-protect notch"; mirroring the existing one on the other side) in order to use both sides of a diskette, simply by turning it over.

With a simple second notch, your box of 10 diskettes could provide 20 sides instead of 10. A bit like the equivalent of 2 boxes of 10 diskettes for the price of 1. It has to be said that diskettes weren't cheap, especially in the early 1980s. A box of 10 diskettes from a good brand cost between $25{3} and $40 in 1980.
{3} 2026 equivalent of $25-$40 from 1980 is $98-$157, or 82€-132€ or £72-£116
The technical explanation is quite simple: some computer manufacturers at the time assumed that the side to be used was the bottom/down side, whilst others assumed it was the top/up/label side. So, diskettes manufacturers were selling "Single Sided" diskettes which, in fact, were perfectly usable on both sides.
With this 2nd notch, you had a "Double Sided" diskette for the price of a "Single Sided" diskette. To convince yourself, examine both sides of the diskette. An "head access slot" — to allow the read head to access the information recorded on the diskette — is present on both sides. Why have an opening on both sides if only one side is supposed to be usable?
In the "Atari 800 Personal Computer System" brochure (© 1979 - ref: 12M-4/79), we can read this in the floppy disk drive section:
"92K bytes storage on each side of diskette".
On each side, meaning that Atari knew about the trick and endorsed the use of the two sides.
Inserting a diskette in the floppy disk drive
I know. Some readers will think I'm joking, but I'm not. For someone who's never done it, how do you know which way it works?
Well, here's how to insert a diskette into an Atari floppy disk drive (810, 1050, XF551).
On this image taken from an Atari manual, here's how to insert side "A" or side "1", the side with the label.

Taking care of your diskettes
The diskette is housed in a non-removable, usually black (but also sometimes coloured) plastic jacket. Since the diskette rotates within this jacket, damage to the jacket will result in damage to the diskette. Therefore, Atari{4} recommends the following care:
- Store your diskettes in their protective paper sleeves and stand them on edge to prevent damage to the jacket and the magnetic surface of the diskette
- Never write on a diskette or on the identification label of the diskette with an erasable pencil or a bail-point pen. We recommend writing on the label with a fiber-tip pen BEFORE you attach it to the diskette
- Never attach paper clips or anything abrasive to a diskette
- Cover the write-protect notch on the diskette with a self-adhesive rectangular black or aluminium label to prevent all write operations to the diskette. This label must be removed to write to diskette. Some diskettes don't have this notch, and thus are already write-protected. Typically, this is the case with genuine/authentic commercial software diskettes. The absence of a notch prevents the software from being deleted or the disk from being formatted
- Never touch the exposed magnetic surface of the diskette itself
- Never wet or wash a diskette. If necessary, use a soft cloth or spray it with compressed air
- Never bend the diskette. Handle your diskettes with care, especially when loading or unloading them into the floppy disk drive
- Heat is one of your diskette's worst enemies. Never store a diskette in direct sunlight or near a source of excessive heat
- Magnetic fields are another of your diskette's enemies. To avoid loss of data, keep diskettes away from magnets, intense magnetic fields and electrical equipment. Stay away from speakers, motors and anything magnetic that can snap a cover shut (tablet, Kindle, etc)
{4} Source: Atari 815 Dual Disk Drive, Operator's Manual, page 31 with my edits and new comments
A diskette must be formatted in an Atari floppy disk drive before it can be used in an Atari system. This formatting operation will create the necessary logical structure on the diskette, as well as the Atari-specific "boot-sectors", directory, map of "free sectors", etc. The diskette will be usable for saving files but not bootable, unless you copy "DOS.SYS" to it.
Atari-branded diskettes
Important note about Atari-branded diskettes:
- Atari CX8100 and CX8202 diskettes must be formatted before first use.
- Atari CX8111 diskettes are already formatted (Format is equivalent to diskettes formatted with Atari 810 floppy disk drives containing the REV. C ROM).
When is reformatting required?
A diskette already formatted with another brand of computers will have to be reformatted in an Atari floppy disk drive before it can be used in an Atari system.
Floppy disk drives
RAM memory requirements
A computer with at least 16 KiB of RAM memory is required to use a floppy disk drive.
When is it safe to eject the diskette?
Do not eject/remove a diskette from a floppy disk drive which is still "busy".
Floppy disk drive number: yes, you can have several floppy disk drives
It's an important point to bear in mind for users who are familiar with the Commodore 64 but not with Atari computers. With a 1541 floppy disk drive for the Commodore 64, it isn't possible to assign two distinct device numbers — say 8 and 9 — easily and permanently to two 1541 floppy disk drives. You must either use a BASIC command (which only remains valid for as long as the 1541 stays powered on), or open the 1541 and physically cut a solder trace on the motherboard.
Atari chose to implement a physical selector switch on the back of the disk drive, allowing the user to operate several floppy disk drives at the same time and assign each one a unique number. A simple pencil or small screwdriver is all you need to change the number easily, permanently and reversibly.
Floppy disk drive number: set it properly for each drive
Floppy disk drives are assigned a unique number for use in the SIO chain.
Check their respective user's manuals to learn how to assign "#1" to drive "D1:", "#2" to drive "D2:", etc.
FYI, each new Atari floppy disk drive is factory-set to drive "#1" by default.


Each floppy disk drive number must be unique in the SIO chain. For instance, only one drive can be set to "#2" to act as drive "D2:". To be precise, there may be two or three or more "#2" drives in the SIO chain, but only one drive identified as "#2" can be turned on at a time.
Floppy disk drive number: the special case of drive #1
The floppy disk drive assigned number "#1" has a special status for the computer. If floppy disk drives are needed for the session, drive "#1" must be powered on before the computer, and ready for use in the SIO chain with a bootable{5} diskette inserted before the computer is powered on.
If requested, at start up time (or [RESET]), computer will seek a drive "#1" and will get "boot-sectors" from it, and then maybe load DOS or another program from it. If the computer was not able to "boot" from drive "#1" for whatever reason, no disk operations will be possible during this session.
{5} I will frequently mention Atari DOS 2.5 throughout this knowledge base since it is the most used DOS format to boot
Which DOS to use to "boot" in drive #1?
Today, most Atari users will use Atari DOS 2.5 as preferred/universal Disk Operating System, and SpartaDOS X otherwise (see below).
What makes an Atari diskette "bootable"?
This depends on whether the diskette has been formatted or not, and which DOS files it contains.
| The diskette ... | You can use it to: | ||||
|---|---|---|---|---|---|
| ...is formatted with Atari DOS 2.5 | ... contains "DOS.SYS" | ...contains "DUP.SYS"{6} | Save data | Boot | Launch Atari DOS 2.5 |
| Yes | Yes | ||||
| Yes | Yes | Yes | Yes | ||
| Yes | Yes | Yes | Yes | Yes | Yes |
{6} "DUP.SYS" is actually the executable that contains the Atari DOS 2.5 menu
Floppy disk drive number: drive #2 and beyond
Floppy disk drives "#2" and subsequent numbers can be inserted in the SIO chain at any time.
They can also be turned off & on as needed.
Obviously, this is not true for drive "#1".
Turning on a floppy disk drive: the special case of drive #1
To turn on a floppy disk drive "#1", proceed in this order:
- Check that no diskette is present in the drive. If present, remove it and immediately store the diskette in its protective sleeve
- Power on the floppy disk drive
- Wait until the start-up/whirling sound is over and the "busy" light goes off
- Gently open the door/lid/latch
- Insert a formatted bootable diskette
- Gently close the door/lid/latch
Turning on a floppy disk drive: drive #2 and beyond
To turn on a floppy disk drive "#2", "#3", etc, proceed in this order:
- Check that no diskette is present in the drive. If present, remove it and immediately store the diskette in its protective sleeve
- Power on the floppy disk drive
Turning off a floppy disk drive
To turn off a floppy disk drive, proceed in this order:
- Wait until the "busy" light goes off, so that all pending operations are completed
- Gently open the door/lid/latch
- Take the diskette out
- Immediately store the diskette in its protective sleeve
- Gently close the door/lid/latch
- Power off the floppy disk drive
You could already have a drive #1 and not even know it
If you use FujiNet or any "SIO-to-<something>" adapter, keep in mind that these peripherals will act & respond to the computer as drive "#1".
It might conflict with a powered on physical floppy disk drive "#1" in the SIO chain.
There are many other very twisted scenarios but I only mention drive "#1" because it is requested for booting.
DOS (Disk Operating System) to use with diskettes
During the decade (and more) that Atari 8-bit computers were on the market, several DOS were offered by Atari:
- DOS 1 (1979)
- DOS 2.0S (1980)
- DOS 3 (1983)
- DOS 2.5 (1984)
- DOS XE (1989)
Consult the FAQ (section: "What is Atari DOS, and what versions did Atari release?") for all the details.
Again, today, most Atari users will use Atari DOS 2.5 as preferred/universal DOS, and SpartaDOS X otherwise.
When you pick up an old/vintage/1980-area 5"¼ diskette for an Atari 8-bit computer, it is 95% likely to be formatted with DOS 2.0S or DOS 2.5.
Let me summarize why Atari DOS 2.5 became the preferred/universal DOS in the community.
DOS 1
DOS 1 was only used when it was the only DOS available, at launch. As soon as DOS 2.0S appeared, no one had any reason to continue to use DOS 1, which quickly faded away.
DOS 2.0S
DOS 2.0S remained the reference DOS for the period 1982-1984 — until the release of DOS 2.5, in fact.
Why this "S" in DOS 2.0S? Because both DOS 2.0S & 2.0D exist. The letters "S" or "D" are used to distinguish them.
DOS 2.0S was created to exploit the classic Atari 810 floppy disk drive.
DOS 2.0D was created to exploit the Atari 815 dual floppy disk drives, of which the few copies still in existence can be abusively considered as prototypes, so rare, expensive, and unobtainable are they.
DOS 2.0S can read DOS 1 diskettes.
DOS 1 will have mixed success reading DOS 2.0S diskettes, with errors at random.
DOS 3
DOS 3, although very innovative, was overwhelmingly rejected by the Atari user community at the time. It was designed to support diskettes but also hard disks — which can be abusively considered as a diskette with a very large number of sectors. So, instead of splitting the available space into sectors, DOS 3 offered the user a splitting of the diskette into blocks of 8 sectors or 1,024 bytes. This sounds like a good idea for a hard disk, but it is a very poor use of the space available on a diskette.
The smallest program 10 PRINT "HELLO, WORLD!" now occupies 1,024 bytes. Any file occupies a multiple of 1,024 bytes.
An unfortunate waste of the very limited disk space available on a diskette for the Atari computers of the time. To top it off, DOS 3 was incompatible with DOS 2.0S. In fact, it could read and retrieve the contents of a diskette formatted in DOS 2.0S, but conversion in the other direction was not allowed.
DOS 2.5
DOS 2.5 — a glaring anomaly in natural numbering — was born out of dissatisfaction with DOS 3. The grumble was so strong that Atari took DOS 2.0S and had it modified to create DOS 2.5 to take advantage of the extra space offered by the 1050 floppy disk drive (130 KiB instead of 90 KiB).
So DOS 2.5 is very similar to DOS 2.0S, except that it can use 130 KiB diskettes ("Single sided, Enhanced density" on an Atari 1050), in addition to 90 KiB diskettes ("Single sided, Single density" on an Atari 810 or 1050).
DOS XE
DOS XE has a funny story. Rumour has it that it was born as a result of a legal constraint.
Jack Tramiel — then owner of Atari — had launched an aggressive advertising campaign to promote the Atari XEgs console, at the expense of Nintendo. In particular, the advertising campaign mentioned the existence of a huge collection of video games available... thanks to the optional floppy disk drive.
The opposing party, Nintendo, then argued that this much-needed floppy disk drive (the Atari 1050) had in fact been discontinued and out of stock for a long time and that, therefore, the promised huge collection of video games was in fact a sham.
To avoid the consequences of a possible disastrous court case, Jack Tramiel — forced to do so — launched a new floppy disk drive in 1987: the Atari XF551.
The Atari XF551 floppy disk drive first shipped with DOS 2.5 (1987-1988) and then with DOS XE (from 1989 onwards), a new DOS able to fully exploit all its possibilities ("High speed mode") and new capacities ("Single sided, Double density", that is 180 KiB and "Double sided, Double density", that is 360 KiB). To be clear, DOS XE is an excellent and well retro-compatible DOS but it comes very late in the history of Atari 8-bit computers. In short, it is its predecessor, DOS 2.5, which is the most popular Atari DOS.
File names on diskettes
Valid and invalid file names, for the file itself
With Atari DOS, file names are in 8+3 format — a direct legacy of CP/M. That is, from 1 to 8 characters for the file name. If the file has an extension — which is not mandatory — then a period is used as a separator, then 1 to 3 characters for the extension.
Nothing but numbers and A-Z capital (uppercase) letters for the file name and the optional extension. The file name must begin with an A-Z capital (uppercase) letter.
Examples of valid file names:
FILEMYPROG.BASGAME.EXEPICTURE3.DATDATA.1
Examples of invalid file names:
.BAS
The file name (mandatory) is missing. This input will not be accepted.1WAY.LST
The name of the file must start with an A-Z capital (uppercase) letter. Although this violates an established rule, this input will be accepted.#2TRACK.DAT
The name of the file must start with an A-Z capital (uppercase) letter. This input will not be accepted.MYPROGRAMME.BAS
The file name is too long. In fact, the name will be cropped at the 9th character and the resulting file name will beMYPROGRA.BASMY FILE.MUS
The file name may not contain spaces. In fact, the name will be cropped at the space character and the resulting file name will beMYGOODFILE.1.BAS
Only one extension is allowed. In fact, the second will be ignored and the resulting file name will beGOODFILE.1ROUTINE.BASIC
The extension can only contain max 3 characters. In fact, the extension will be cropped at the 4th character and the resulting file name will beROUTINE.BAS
Complete file names, including floppy disk drive to use
The full file name must include the floppy disk drive letter, a number and a colon as prefix, such as "D1:". Alternatively just "D:" is a synonym for floppy disk drive #1, that is "D1:"
Examples of valid full file names:
D1:FILED:MYPROG.BAS(synonym ofD1:MYPROG.BAS)D2:GAME.EXED8:PICTURE3.DATD2:DATA.1
Files signature
By convention{7}, starting with Atari DOS 2.0S, an Atari executable program/file begins with the signature $FF $FF (255, 255 in decimal). This is not required, but should be included to aid with identification of the file as an executable.
By obligation{8}{9}, an Atari BASIC program saved with the SAVE or CSAVE instruction (in tokenized form) must begin with the signature $00 $00 (0, 0 in decimal). This is mandatory. The LOAD instruction will fail if these two $00 $00 are not present at the beginning of the file.
{7} Source: Altirra Programming Reference Manual (preliminary) 2019-03-09, page 29 — no longer available for download
{8} Source: "Compute! The Atari BASIC source book", from archive.org
{9} Source: "Compute! Magazine, May 1982, Issue #24, pages 164-165", from archive.org
The reason for this obligation is as follows: At the very beginning of the file, Atari BASIC saves the value of 7 pointers — on 2 bytes, to encode address values from 0 to 65,535 in decimal. These pointers are essential to the definition and execution of a program: LOMEM (pointer to low memory limit), VNTP (variable name table pointer), VVTP (variable value table pointer), etc...
Before saving the pointers, the value of LOMEM is subtracted from the 7 pointers. The first LOMEM-LOMEM vector, encoded on 2 bytes, therefore has the value $00 $00.
Atari DOS 2.5 will, in fact, convert lower case to upper case for you
If, in Atari BASIC, you save a program with SAVE "D1:myfile.bas", a quick visit to DOS will reveal that it has been actually saved as "MYFILE.BAS".
The Atari BASIC instruction LOAD "D1:myfile.bas" will not generate an error and will load "MYFILE.BAS".
In summary, the file exists and has been saved with the name "MYFILE.BAS". Therefore, for Atari BASIC and Atari DOS 2.5, "myfile.bas" and "MYFILE.BAS" are one and the same file. Don't use both names thinking that they will be treated as two different files.
Also, in Atari DOS 2.5, the conversion is also done automatically. For example, a request to rename the file "OLD.BAS" to "new.bas" will be processed successfully, and the new file name will obviously be "NEW.BAS".
Extensions are just conventions
The extension names are "just" naming conventions respected by the community of users. This means that the name of the extension does not necessarily and mandatorily reflects its actual content. It also means that Atari DOS cannot guarantee that "GAME.EXE" is really an executable file. It could very well be a data file or a BASIC game. Of course, it would be absurd to name such a file "GAME.EXE" but DOS allows it.
This is by no means an exhaustive list, but simply a very short list of the most common extensions you will encounter:
| Extension | Typical use |
|---|---|
| .ASM | An assembly language source file. |
| .BAS | Atari BASIC program saved in tokenized form — so unreadable with a text editor — with the BASIC instruction SAVE "D1:FILENAME.BAS".It will be loaded with the BASIC instruction LOAD "D1:FILENAME.BAS" or RUN "D1:FILENAME.BAS".Note: "AUTORUN.BAS" is a BASIC program that will be automatically launched by Turbo-BASIC XL at start-up. |
| .BAK | A backup file. Depending on the context, the backup copy of a source file of a program in Assembler, Action!, BASIC, etc. |
| .BXE | OSS BASIC XE program saved in tokenized form — so unreadable with a text editor — with the BASIC instruction SAVE "D1:FILENAME.BXE".It will be loaded with the BASIC instruction LOAD "D1:FILENAME.BXE" or RUN "D1:FILENAME.BXE". |
| .BXL | OSS BASIC XL program saved in tokenized form — so unreadable with a text editor — with the BASIC instruction SAVE "D1:FILENAME.BXL".It will be loaded with the BASIC instruction LOAD "D1:FILENAME.BXL" or RUN "D1:FILENAME.BXL".Note: "AUTORUN.BXL" is an OSS BASIC XL program that will be automatically launched by OSS BASIC XL at start-up. |
| .COM | Same as .EXE (purists will disagree, but I simplify). Also recognised by Microsoft Windows as executable file but no one seems to care. |
| .DAT | A data file. |
| .EXE | Machine language program. With an Atari DOS 2.5, you can run it with the instruction "L. BINARY LOAD" from the menu. Also recognised by Microsoft Windows as executable file. See .XEX |
| .LST | Atari BASIC program saved on diskette as a "plain English text listing" (ATASCII) file with the BASIC instruction LIST "D1:FILENAME.LST".It will be loaded with the BASIC instruction ENTER "D1:FILENAME.LST", which will merge the BASIC program currently in memory with the contents of "D1:FILENAME.LST". |
| .OBJ | An object-code file. |
| .TMP | A scratch or temporary file. |
| .TXT | A text file. |
| .SAP | OSS BASIC A+ program saved in tokenized form — so unreadable with a text editor — with the BASIC instruction SAVE "D1:FILENAME.SAP".It will be loaded with the BASIC instruction LOAD "D1:FILENAME.SAP" or RUN "D1:FILENAME.SAP". |
| .SMB | Microsoft BASIC program saved in tokenized form — so unreadable with a text editor — with the BASIC instruction SAVE "D1:FILENAME.SMB".It will be loaded with the BASIC instruction LOAD "D1:FILENAME.SMB" or RUN "D1:FILENAME.SMB". |
| .SYS | Very likely a machine language program. Maybe a file that constitutes the Atari DOS, or a driver/handler. Note: "AUTORUN.SYS" is a program that will be automatically launched by Atari DOS (except Atari DOS 1) at start-up. |
| .XEX | Same as .EXE (actually, it is a renamed .EXE file). The files with a ".EXE" extension are recognised by Microsoft Windows as executable files. To prevent your Microsoft Windows computer from allowing you to try to run them and/or your antivirus software from scanning them, it is common to rename Atari ".EXE" files to ".XEX" so that Microsoft Windows doesn't know what to do with them. In Microsoft Windows, you can then associate .XEX with your favourite Atari emulator. On the Atari side — emulator or actual computer —, it will make no difference: with an Atari DOS 2.5, you can run it with the instruction "L. BINARY LOAD" from the menu. |
Forbidden file names
Some file names are reserved and their use should be avoided for your own files:
-
The file name "DOS.SYS" is a reserved name that you cannot use for your own files. If you try to create an empty "DOS.SYS" file with Atari BASIC for example, the file will be created but will contain a copy of the Atari DOS "DOS.SYS" file.
Very practical consequence: if you booted with Atari DOS 2.5, enter the following BASIC instruction
CLOSE #1:OPEN #1,8,0,"D1:DOS.SYS":CLOSE #1to make "bootable" the formatted diskette in floppy disk drive #1, that is "D1:".
CLOSE #1:OPEN #1,8,0,"D2:DOS.SYS":CLOSE #1if the formatted diskette is in drive #2, that is "D2:", etc.
-
The file name "MEM.SAV" is also a reserved name that you cannot use for your own files. If you create and use a "MEM.SAV" file with Atari BASIC for example, the file will be created but it may well have its contents completely overwritten if you then go to DOS. Indeed, Atari DOS 2.5 will find this "MEM.SAV" file on the diskette, and will conclude that you want to use this feature offered by DOS ("N. CREATE MEM.SAV"). DOS will thus overwrite your data with a copy of (part of) the computer's RAM memory to preserve your existing Atari BASIC program while running the DOS ... at the expense of your "MEM.SAV" file.
Very practical consequence: if you are unsure whether or not you have requested to use "MEM.SAV" when you need it, enter the following BASIC instruction
CLOSE #1:OPEN #1,8,0,"D1:MEM.SAV":CLOSE #1to activate it on the formatted diskette in floppy disk drive #1, that is "D1:".
Caution is required when renaming files
Be careful if you rename multiple files ("E. RENAME FILE") with Atari DOS 2.5 using wildcards such as "*.EXE", "*.BAS", etc{10}. It does not check if the diskette already contains a file with the same name. And worse, it accepts to rename your files anyway! So you can end up with two files with the same name on the same diskette, and the troubles begin. To fully appreciate the resulting mess, you have to experience it. There are special tools — such as DiskFix utility for Atari DOS 2.5 — to solve the problem, but there is no provision for this in the standard Atari DOS 2.5 menu.
{10} Example: A diskette contains the files GAME.EXE, GAME.DAT and MAP.DAT. If you ask to rename all the *.DAT files to *.EXE, you will get GAME.EXE (1st copy, actually not renamed), GAME.EXE (2nd copy) and MAP.EXE. There will be no warnings, no error messages. But you do have two files with the same name on the same diskette.
Consult the manual for the DOS you are using for full details.
Consult the FAQ for more information.
Cassette tapes
Typical commercial product.
Here is a box of Agfa cassette tape, made in Germany and sold in Europe: Length/duration: C15.
Note the branding "PC15" ("PC15" for "Personal Computer 15" ?, instead of just "C15") and the words "Computer cassette", probably to justify the price for such a small length/short duration: look carefully at the amount of magnetic tape in the cassette case.
The packaging is in English and French.
And finally, two variations of the same Philips CP15 cassette, both made in Belgium and sold in Europe. Length/duration: C15.
Note the branding "CP15" ("CP15" for "Computer Program 15" ?, instead of just "C15") and the words "Computer cassette", also probably to justify the price for such a small length/short duration.
The "all white" model is in English and French; The "black with white cassette" model is in English, French, Dutch and German.
Note that Philips gives a lot of detail: the cassettes are leaderless, meaning that they contain only magnetic tape, and no leader. The length is even specified: 22 metres. The capacity is given, based on the data rate expressed in baud (600 bauds for Atari).


Duration
The duration of a cassette tape, when used to record audio, is usually expressed by the letter "C" followed by the total recordable time (duration of combined Side A + Side B), expressed in minutes. Typical examples: C05, C10, C12, C15, C30, C45, C60, C90 or C120.
For instance, on a C60 cassette — i.e. 60 minutes in total — it is possible to record 30 minutes of audio per side.
When they first appeared, cassettes were usually available in durations ranging from C45 to C90.
The C45 duration — 45 minutes in total, or around 22½ minutes per side — was the perfect length for recording a vinyl LP/Album record.
The short durations C05 to C30 appeared later in the late 70s, when cassette tapes began to be used as storage media for home computers. Their very existence was not justified by any specific "computer-special-quality" but simply by the fact that it was more convenient to store programs on relatively short cassettes.
The extra-long C120 appeared later, but the C120s were fragile: to be able to be that long, the magnetic tape had to be much thinner in order to physically fit into the case/shell. They could therefore tear easily and tended to be "swallowed" by the cassette tape player/recorder.
Type
Over the years, manufacturers of audio cassettes (and the corresponding HiFi equipment for playing them) have made great strides in improving the quality of the recorded sound signal and the residual background noise. I'm not talking about noise reduction mechanisms (Dolby or dbx) that use special algorithms during playing and recording to reduce the noise. I'm talking about the enhanced chemical formula used for magnetic tape.
In the world of audio, there are several families and qualities of magnetic tape used in audio cassettes:
- Type I / Standard ferric oxide (Fe2O3). This is the ordinary cassette, the least expensive. Its performance is already very good.
- Type II / Chrome (CrO2). This is the higher quality cassette.
- Type IV / Metal (Me). This is the cassette for very demanding purists and wealthy music lovers who are prepared to pay a high price.
In practice:
-
In the audio world, all cassette tape players/recorders can play and record on all these types of cassettes.
But only the HiFi models that "recognise" the higher quality (Type II/IV) of the cassette — thanks to notches on the top of the case/shell — can take advantage of the higher quality cassettes.
-
In the computer world, all Atari cassette tape players/recorders are designed to use Type I / Standard ferric oxide (Fe2O3) cassette tapes.
Type II / Chrome (CrO2) or Type IV / Metal (Me) cassettes must not be used, as they could damage the playback head of the Atari cassette tape player/recorder.
Write-protect notch
Two notches — for Side A & B — on the top of the case/shell cassette indicate whether writing is allowed or not. The notches, purposely easy to break, cover small holes.
If the notch is present, writing is authorised on this side.
If the notch is not present and the small hole is accessible, writing is prohibited on this side.
If the notch is not present, but covered with additional adhesive tape so that the small hole remains inaccessible, writing is authorised on this side.
If the cassette is held with one of the labels facing the user and the tape opening at the bottom, the write-protect notch for the corresponding side is at the top-left.
Source: Wikipedia articles about Cassette tape
Which type of blank cassette tape to buy?
If you want to buy blank cassette tapes, then, for simplicity and convenience, buy C60 or C90 Type I / Standard ferric oxide (Fe2O3) tapes.
Do not buy, and do not use Type II / Chrome (CrO2) or Type IV / Metal (Me) cassette tapes.
Off-the-shelf commercial audio tape players/recorders
Simply put, you cannot use an off-the-shelf commercial audio cassette tape player/recorder with your Atari computer. And it's not only for connectivity reasons (SIO vs. DIN or Jack).
When you save a program, the Digital ("0" & "1") to Analog (sound to record on tape) conversion is done by the computer{11}: The POKEY sound chip generates the tones that are used to encode "0s" (3,995 Hz) and "1s" (5,327 Hz).
When you load a program, the Analog (sound read from tape) to Digital ("0" & "1") conversion is done by the cassette tape player/recorder{12} itself. For this purpose, the Atari-special-cassette tape players/recorders include two narrow-band filters tuned to the two frequencies. During a read, the output of one or the other of these two narrow-band filters would be asserted as the bits are read off the tape. These bits are sent as digital data back to the computer.
For this reason, a commercial audio cassette tape player/recorder cannot be used with an Atari computer; unless it relies on an additional external interface to perform the A-to-D conversion then routed via an SIO cable.
{11} Source: "De Re Atari" book, Appendix C "The Atari Cassette", from archive.org
{12} Source: Wikipedia article about the Atari SIO port
Atari cassette tape players/recorders
Turning it on or off
An Atari cassette tape player/recorder can be inserted in the SIO chain at any time.
It can be turned on & off as needed (they have no Power switches; you must unplug their power cable).
What to do first when you buy a 2nd hand model
Before using a 2nd hand cassette tape player/recorder you have just bought, clean the playback head and capstans with a cotton swab soaked in a little IPA (Isopropyl Alcohol).
The special case of the cassette tape player/recorder
The cassette tape player/recorder is actually a "dumb" peripheral. Unlike other Atari peripherals connected to the SIO port, no intelligent communication is possible between the computer and the cassette tape player/recorder.
In theory, all the peripherals on the SIO bus must conform to the SIO protocol.
| Standard SIO protocol | Exception for the cassette tape player/recorder |
|---|---|
| The peripherals have a unique identifier and unique number on the SIO bus | N/A |
| The computer sends commands to the peripherals, using this unique identifier and unique number | The computer cannot send any standard SIO command to the cassette tape player/recorder. A special pin in the SIO port is just designed to ask the cassette tape player/recorder to "start the motor" |
| A peripheral never takes the initiative to communicate on the SIO bus. It only responds if requested to do so by the computer | If you press the "PLAY" button and switch on the motor with a special POKE 54018,52 instruction in BASIC, the cassette tape player/recorder will read the tape and send the result to the computer, whether or not the computer requested it |
| The computer sends and receives data which is formatted in the same way for any device on the SIO bus |
From the computer's perspective:
|
Consequently:
- The computer has no way to sense the presence (or absence) of a cassette tape player/recorder
- The computer cannot get any "status" from the cassette tape player/recorder and has no way of knowing if one is ready for use
- The computer does not control the cassette tape player/recorder operations such as play, record, fast forward, rewind, reset counter. You do
- The computer has no way to sense the position (pressed/released) of the "RECORD" & "PLAY" buttons
The computer can ask the cassette tape player/recorder to start the reading — sending the order to start the motor, in fact — but it will work only if you manually depressed "PLAY" first.
The computer can ask the cassette tape player/recorder to start the recording — sending the order to start the motor and then sending the data to save, in fact — but it will work only if you manually depressed both "RECORD" & "PLAY" first.
Only one cassette tape player/recorder
The computer can only operate one cassette tape player/recorder at a time.
If several are powered on and inserted in the SIO chain, they will all conflict with each other.
Proper order in the SIO chain
Some models of cassette tape players/recorders will have to be last in the SIO chain since they only have one SIO connector. Some versions of the book "De Re Atari" mention that this single SIO connector was intended to prevent the user from plugging in a 2nd cassette tape player/recorder.
All other models with two SIO connectors can be placed anywhere in the SIO chain. It is customary to place the cassette tape player/recorder last. However, if you have systematic problems reading or writing with the cassette tape player/recorder, move it closer to the computer in the SIO chain.
Rewind and set counter to 000
Before use for loading (reading), rewind the cassette tape and reset the counter to 000.
Before use for saving (recording) your first program on the tape, rewind the cassette tape and reset the counter to 000.
After use, always rewind the cassette tape.
Note counter positions
When saving a program to cassette tape, carefully note the position of the counter before (where the tape was before recording) and after (where the tape is after recording).
Taking note of the tape position before recording is useful for knowing where to cue the tape to read the program.
Taking note of the tape position after recording serves two purposes:
- Firstly, when loading the program, to have an idea of how much time is left — Atari BASIC is unable to tell whether it has loaded 5% or 50% of the program
- Secondly, to know where you can start saving the next program
About the counter positions
Tape counters are reliable and consistent as long as you keep using your own program recorder (and rewind the tape completely before resetting it to 000).
However, the same cassette will produce different tape counter values in a different program recorder, whether of the same or a different model.
Safe storage of your cassette tapes
When not used, store the cassette tapes in their protective plastic boxes, away from direct sunlight, source of excessive heat and any magnetic field source. Never touch the magnetic surface with your fingers.
Storage capacity and duration of operations
According to the Atari documents and brochures, a C60 cassette — 60 minutes long — can store 100 KiB, so 50 KiB per side of 30 minutes. The longest possible program in Atari BASIC can therefore fit on one side of a C60 without any problem if it is saved with the CSAVE instruction.
Each program recorded on cassette tape begins with 20 seconds of an audio sequence with fixed frequencies, called the "leader tone". This "leader tone" is used during loading to measure and check the speed of the cassette tape player/recorder. Consequently, any tiny program (ex: 10 PRINT "HELLO, WORLD!") will take at least 25-30 seconds to record.
During saving, the computer uses a tiny internal buffer to create "data packets" to record on tape. The cassette tape player/recorder itself has no buffer. Therefore, if you save a program that uses 20 minutes of tape, you will have to wait 20 minutes before the computer is ready to take your orders again. The same logical reasonning applies to reading operations. Patience is a must when using a cassette tape player/recorder.
Pause?
The usefulness of the "PAUSE" button on the Atari cassette tape players/recorders is puzzling to users.
For a start, not all Atari cassette tape players/recorders have a "PAUSE" button.
Then, you need to know that it is impossible to interrupt the recording or reading of a program on cassette tape. It is also impossible to change sides or cassette tapes during an operation. The recording or reading must be performed in one interrupted phase.
In the "Atari 800 Personal Computer System" brochure (© 1979 - ref: 12M-4/79), we can read this in the program recorder section:
"Pushbutton controls for rewind, fast forward, stop, record, play, and eject".
Absolutely no mention of a "PAUSE" button. Plus, the Atari 410 depicted on the brochure does not have any "PAUSE" button.
The justification is probably quite simple: Atari based its Atari cassette tape players/recorders on existing mechanisms, or even existing complete models, and modified them to suit its requirements (SIO port, A/D conversion of the signal read, etc). So this unused "PAUSE" button came with it, on some models.
Stereo
By design, absolutely all Atari cassette tape players/recorders are stereo.
The right channel contains the data or the program; the left channel contains any soundtrack from a commercial program.
Music!
Since Atari cassette tape players/recorders do not comply with the standard SIO protocol, you can also choose to start the motor to listen to music, for example, while programming.
In BASIC, the POKE 54018,52 instruction starts the motor (but you have to press the PLAY button manually), while the POKE 54018,60 instruction stops the motor.
If your recording is mono, there's nothing special to report. If your recording is stereo, you will hear only the left channel.
Reliability
The Atari cassette tape players/recorders can be considered "quite reliable". The vast majority of other computers of the same era offered much cheaper solutions based on commercial cassette tape players/recorders. Quality of the mechanism, audio recording level, volume during replay, speed variation, etc... many parameters could make tape backups really risky.
The Atari cassette tape players/recorders were more expensive and certainly overpriced during the Warner period, but they were designed and calibrated explicitly for this sole task. So, they were "quite reliable" but not "100% failsafe" either.
To increase your chances of re-reading successfully your programs and data files, I suggest a couple of things to consider for recording:
- Use quality blank cassette tapes if you can still find some or, alternatively, properly erased/demagnetised tapes.
- Save your important programs or data twice, on two different cassette tapes. Yes, this is very time consuming, but it is always faster than re-typing everything.
- Do not store programs immediately after each other. Leave about 3-5 seconds of pure silence between each program.
- A program recorded as a "plain English text listing" (ATASCII) with a
LIST "C:"instruction will take more time to record and more space on the tape, for sure. But, in case of problems during the reading — due to a small damaged section of the tape for example — if it cannot be read completely, it will most probably be possible to read it at least partially{13}. This partial read is impossible with a tokenized program saved with aCSAVEorSAVE "C:"instruction. - Before and during recording, the computer has no way of knowing whether there are 3 or 30 minutes worth of free tape left on the cassette tape. It will blissfully start the saving process and may not be able to finish because there is not enough free tape. It is up to you to deal with this problem and to provide enough tape for your long programs.
{13} This is exactly what a short program published in "Personal Computer News, July 14 1984, page 14" proposes. The principle is simple: the program saves in a giant character string all the characters read back 1 by 1 on the cassette tape. Instead of stopping in the event of an error, the program is designed to request the reading of the next byte, ignoring the reading error. To be exact, two error cases are handled by the program: -1- Memory is full. -2- The end of the file has been reached. In this second case, the program immediately proposes to re-write, on another cassette tape, the giant character string that it was able to create by re-reading what was readable. In the end, only the program lines encoded on the location where the tape was really unreadable will be lost. The result of the recovery will be readable with an ENTER "C:" instruction.
Tapes with soundtrack
Some programs on cassette tapes offer to listen to a "real" soundtrack{14} (music, recorded voices, instructions, commentary, etc) while loading a program or game. At home, you will not be able to recreate yourself such tapes with a "real" soundtrack in addition to the recorded program with "just" your Atari computer and your Atari cassette tape player/recorder. Additional equipment is required.
{14} This feature is presented in the description of the Atari 1010 under the name "Dual channel for sound and data" in the brochure "Introducing the home computers for the 80s" and under the new name "Speech playback capability" in the 600XL/800XL/1400XL/1450XLD 1983 US leaflets, published after the former. The new name was certainly chosen to echo the speech synthesizer chip (Votrax SC-01 or Votrax SC-02) present in the 1400XL and 1450XLD (both never released). This feature is available for all Atari cassette tape players/recorders, starting with the 1st one, the Atari 410.
The Atari cassette tape player/recorder can record on tape data from the computer — data that is recorded in audio form, incidentally — but it has no provision for recording an additional "real" soundtrack, either from the computer or from a line-in socket.
You will need to use audio mastering software on your Windows/MacOS/Linux computer, inserting the additional "real" soundtrack in the "left" channel and the audio track corresponding to the program to be saved in the "right" channel.
Handle with care
I wouldn't go so far as to say "fragile" but I can say that the Atari cassette tape players/recorders are not of "German industrial quality". Press the keys firmly but gently. Do not jump directly from "FF" to "RWD", from "RWD" to "FF", from "PLAY" to "FF" or "RWD", etc. Gently stop the tape between each operation.
File names on cassette tapes
No such thing
Atari BASIC programs saved on cassette tapes do not have names. Period.
The Atari BASIC CSAVE instruction does not accept any parameter. When loading with CLOAD, the cassette tape player/recorder will simply read the program it finds on the cassette tape, where the tape is positioned. It's up to you to cue the tape in the right place.
The Atari BASIC instructions SAVE "C:MYPROG.BAS", LIST "C:MYPROG.LST" or SAVE "C:This is the name of my program" — let's go crazy, the Atari DOS 8+3 file naming convention does not apply here — will not make any difference.
Workaround #1
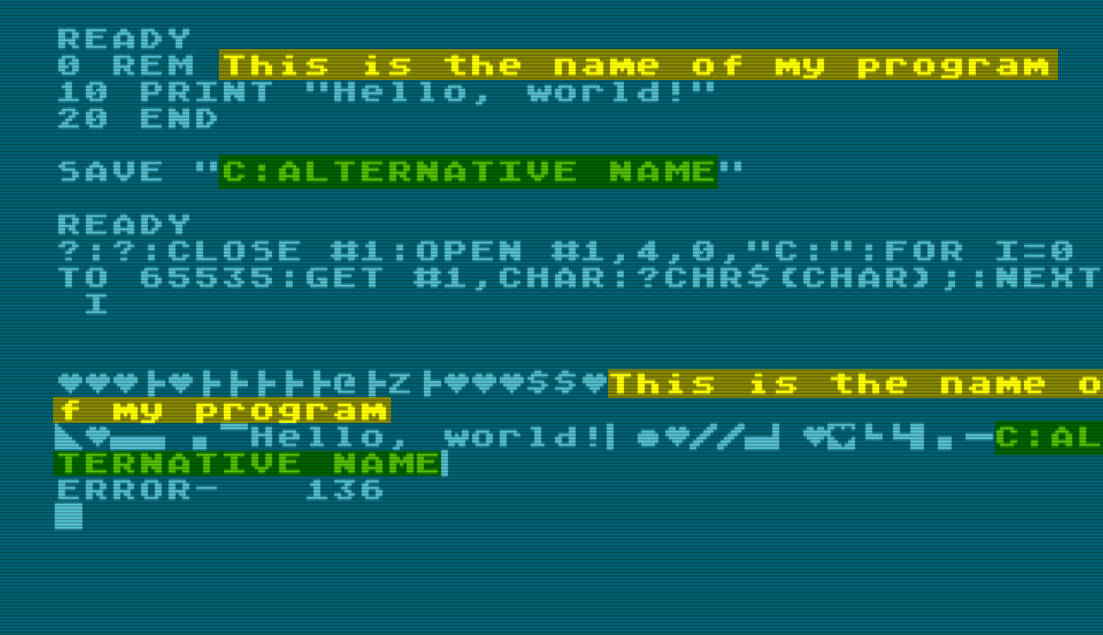
In fact, it is a bit more complicated than that: the command line itself which is used to save the program is actually also saved as a dummy line #32,768 ($8000) at the end of the program, and is thus visible at the end of the file on the cassette tape.
If you saved you program with, for instance, aSAVE "C:Alternative name", that name will appear at the end of the file.
Workaround #2
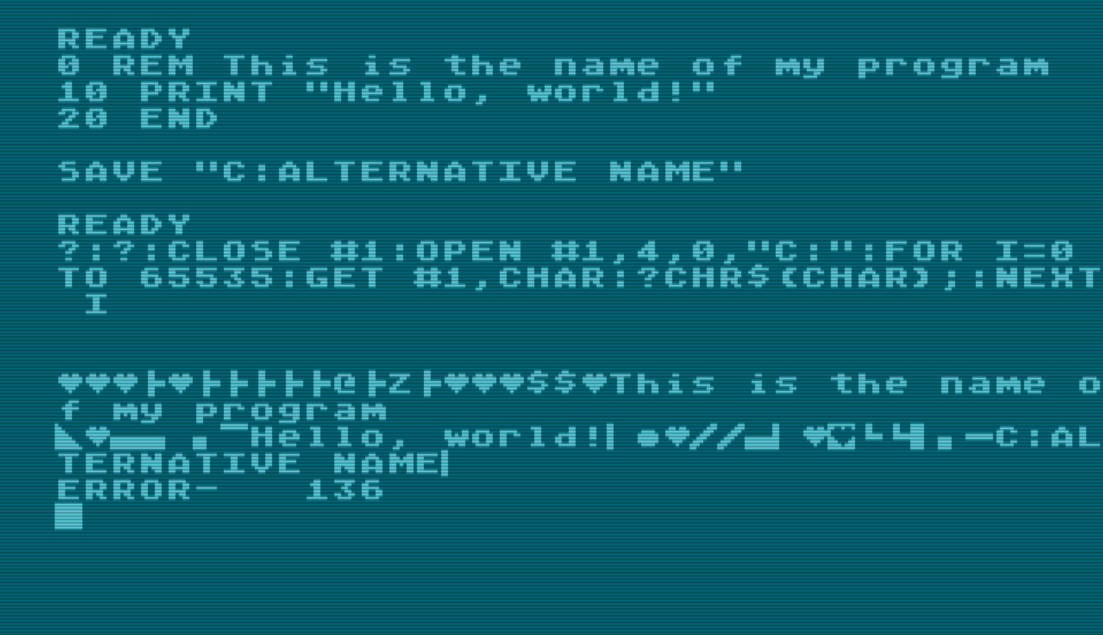
Another trick would be to start the program with a line such as 0 REM This is the name of my program and then re-read the beginning of the program from the cassette tape "as a data/text file" to see this name appear without having to re-read the whole program.
How to read these program names?
A command line like this one allows the program to be read back as if it were a data/text file:
?:?:CLOSE #1:OPEN #1,4,0,"C:":FOR I=0 TO 65535:GET #1,CHAR:?CHR$(CHAR);:NEXT I
At some point, you will get an Error 136, which is normal and expected. Error 136 simply means that you have reached the end of the file on the cassette tape (no more data to read). Nothing to worry about.
This command line preserves the program currently in memory: it is neither deleted nor altered by this operation.
It is therefore a very good way:
- To read the name you have given to a program recorded on cassette tape, thanks to one of these two workarounds
- To check that the program you have just saved can be successfully read back, up the instruction that was used to save it. If there is a re-read error, there is still time to save it to another cassette tape.
Just workarounds
But, well, for the sake of simplicity, I'll conclude that you can't find an Atari BASIC program by name on a tape.
Cassette tape or Diskette? How do they compare?
For new generations who are familiar with digital content but who have never used either cassette tapes or diskettes, the question is really relevant. After all, cassette tapes and diskettes are both magnetic media with a lot of common physical characteristics. At the end of the day, what makes them so different?
| Cassette tape | Diskette | |
|---|---|---|
| Peripheral purchase price | By far the most economical storage device: Still too expensive for what it was during the Warner period; very economical during the Tramiel period: he halved the price. | Quite expensive: At the launch of the Atari 400/800, the Atari 810 floppy disk drive was even more expensive than the Atari 800 computer itself! A floppy drive has always been a fairly expensive peripheral over the period 1979-1984. |
| Media purchase price | Very inexpensive: A standard blank audio cassette tape of very average quality did the trick. | Quite expensive: But less and less so between 1979 and 1984. The price of 5"¼ diskettes began to fall seriously when 3"½ diskettes appeared on the market. |
| Storage capacity | Independent of cassette tape player/recorder model. Capacity depends solely on the physical length of the magnetic tape in the cassette tape case/shell. Approximatively 100 KiB per C60 cassette tape. | Depends on the model of floppy disk drive and the type of diskette. It ranges from 90 KiB to 360 Kib per diskette. |
| Media availability | Short cassette tapes (C05, C10, C15 or C30) were sold in specialist computer shops. The regular audio cassette tapes (C45, C60, C90 or C120) could be bought absolutely anywhere: supermarkets, hypermarkets, malls, petrol/gas stations, department stores, night shops, etc. | Diskettes were sold in specialist computer shops, department stores with a computer corner, etc. |
| Number of files open simultaneously | Just one. Only a single file can be read from or written to the tape at a given time. To read several files, they must be read one after the other. | Several. The actual number depending on the DOS and settings chosen. Several files can be opened simultaneously, in parallel, for reading, writing or updating. Several files can be read at the same time. |
| Type of access | Sequential access: To access a file located at the end of the tape, the entire magnetic tape must be unrolled. | Direct access: Any area of the diskette can be accessed directly. |
| Time required to reach the beginning of a file | Depends on the position of the file on the cassette tape: In the worst case, you have to unroll almost all the tape in the cassette tape. | Immediate: The read/write head can move anywhere, almost instantaneously. |
| Time required to read or write a file | Transfer speed limited to 600 bauds by Atari — that is 600 physical bits per second — a very unambitious choice. According to various sources{15}{16}, Atari could have chosen a value ranging from 300 to 1.400 bauds, without any hardware or software change. It takes between 5 and 20 minutes to load a game. | Much, much faster than a cassette tape player/recorder. Speed varies greatly depending on the model of floppy disk drive, ROM used, drive enhancements added, presence of a title screen, etc. Only a couple of minutes to load a game, sometimes less than that. |
| Do not... | ... buy, and do not use Type II / Chrome (CrO2) or Type IV / Metal (Me) cassette tapes. | ... buy, and do not use HD "Double Sided/High Density" (2S/HD) 5"¼ diskettes. |
{15} "De Re Atari" book, Appendix C "The Atari Cassette", from archive.org.
{16} This fact is confirmed by the listing of the Operating System published in the "Rare Atari documents" section.
See the variable B00600 in the Cassette Timing Equates section: B00600 = $05CC ;600 baud POKEY counter value.
See the following sections in the source code:
PCI — Process Cassette I/O
CIN — Initialize Cassette
OCO — Open Cassette for Output
TPFV — Table of POKEY Frequency Values, especially the commented lines
Video output
These computers were originally designed to take advantage of the display devices a typical home user might have had at the time. In most cases, this meant the living room CRT television, with its few analogue video inputs. Occasionally, it referred to a monitor purpose-built to display computer-generated imagery, offering increased sharpness.
Unfortunately, today's televisions are increasingly lacking analogue video inputs — most of them don't have analogue video inputs at all anymore. Therefore, the Atari computer's analogue video signal needs to be converted into a very clean digital signal that a modern television with today's connectors will accept.
I won't even consider the possibility of using RF antenna signal output — that really is the worst option of all. Depending on the Atari model you own, you likely have one or more of these video outputs: Composite Video (CVBS), Luminance only, or S-Video. What's needed is an adaptor or converter capable of taking one of these outputs — CVBS, Luminance only, or S-Video — and converting it into HDMI, for example.
That said, I must highlight something important. Computers of the time often bent the rules when it came to strict video signal standards. This didn't matter back then, as televisions were quite forgiving, happy to accept a signal with slightly incorrect frequency or atypical characteristics.
Today's modern televisions, however, are the complete opposite: they tolerate absolutely no deviation from standardised video formats. So the HDMI signal you provide must be impeccably clean.
Video converters are available at all price points, but let's be realistic: to get a stable and visually pleasing result, possibly emulating scan lines, soft blur and screen curvature, you'll need a high-quality (i.e. expensive) product — something like a RetroTINK, for instance. Alternatively, you could explore monitors made specifically for retro gaming, featuring all the analogue inputs you require. However, a good old CRT TV Set still offers the most authentic look and behavior for vintage graphics.
Mixing NTSC, PAL, SECAM software?
NTSC, PAL, and SECAM computers are essentially variants of the same machine, designed for sale and use in different regions. Back then, the main differences between these regions were:
- The voltage of the domestic electricity supply — this still holds true today, though it has also evolved somewhat
- The technical characteristics of the local television video signal, primarily differing in image refresh rates (50 Hz or 60 Hz), the number of displayed lines, black-and-white signal standards, and on top of that, differing colour encoding systems — much of this has since been simplified and holds less significance nowadays
Please read the "NTSC/PAL/SECAM/PERITEL" article in the knowledge base for all details.
The official FAQ includes a section that clearly explains what happens when you run NTSC, PAL, or SECAM programs on a computer of a different standard. Please read the "How may a program behave on NTSC/PAL/SECAM computer versions?" section in the Atari 8-bit FAQ for all details.
In a nutshell:
- The program may run faster or slower than intended
- The program may exhibit some sort of "screen flickering" effect
- The system may crash
- The colours displayed by the program are not what was intended
- The program may explicitly refuse to run on incorrect hardware
- The program may not load correctly at all
- The program may run fine on both NTSC and PAL/SECAM machines
Software written for NTSC machines (North America) will (almost) always work on PAL/SECAM machines (Europe), but software designed on PAL/SECAM machines sometimes won't work as intended on NTSC machines.
Turning "on" the system
Reminder: Always turn on the computer last.
Turn on the TV or monitor. Select video input. Adjust volume.
If you don't use the TV or monitor for sound reproduction, turn on the appropriate device and select the audio input. Adjust volume.
[Optional] If floppy disk drives are needed for the session, drive "#1" must be powered on before the computer, and ready for use in the SIO chain with a bootable diskette inserted.
[Optional] If Atari 850 peripherals are needed for the session, turn the Atari 850 interface on. Then turn these peripherals on.
[Optional] If you need to disable the BASIC...
... on a 400/800/1200XL, make sure no Atari BASIC cartridge is inserted.
... on a 600XL/800XL, 65XE/130XE/800XE & XEgs, press and hold the "OPTION" keys for 5 seconds while you turn the computer on. This will disable the internal BASIC in these computers that have it.
Finally, turn on the computer.
You can later turn on or off other peripherals, as needed.
Please read the "How to run a program on tape, diskette, cartridge" article in the knowledge base for all details.
Please read the "How to run a program on tape, diskette, cartridge - Advanced scenarios" article in the knowledge base for all the details.
Turning "off" the system
Reminder: Always power off the computer first.
So, proceed: turn off the computer now.
If you had turned up the volume very high, it is a good idea to turn it down back to normal BEFORE powering off the device that was playing the sound: A CRT or modern monitor? A CRT or modern television? A home cinema amplifier? A connected speaker? Turn it down before you forget.
Power off the TV or monitor or any other display device you have used.
[Optional] If applicable, power off any additional sound reproduction or amplification devices you have used.
If you used a cartridge:
Gently remove the cartridge. Store the cartridge in its original packaging or protective box. On a 400 or 800, gently close the cartridge door (lid).
If you used a floppy disk drive:
Don't rush to turn off the floppy disk drives. They are "intelligent" peripherals, capable of autonomously performing an operation previously requested by the computer. For instance, if you request the formatting of a diskette, the operation (formatting) will continue and complete successfully even if you then turned off the computer. In short, wait for the "busy" light to go out, so that all pending operations are completed. Gently open the door/lid/latch. Remove the diskette. Store the diskette in its protective sleeve. Gently close the door/lid/latch of the floppy disk drive. Power off the floppy disk drive.
If you used a cassette tape:
Press "stop" on the Atari cassette tape player/recorder. Then completely rewind the cassette tape. Reset the counter to 000. Eject the cassette tape. Place the cassette tape in its protective plastic shell. Close the compartment door of the Atari cassette tape player/recorder.
If you used a printer:
Wait until the printer stops printing, so that all pending operations are completed. If the printer has a buffer memory (internal or external), it can continue printing for several minutes after the computer has been shut down. When the printing stops for good, power off the printer.
[Optional] If applicable, power off any additional peripheral or device — video converter? video upscaler? modem? "SIO-to-<something>" adapter? anything else? — you may have used.
Essential keyboard shortcuts
Here are some essential keyboard shortcuts. This is by no means an exhaustive list of all keyboard shortcuts. I invite you to read the computer manuals if you're looking for the full list. It is simply a list of essential shortcuts, for those new to Atari computers.
Note: the [CONTROL] key is named [CTRL] on the Atari 400/800.
| Keyboard shortcuts | Purpose |
|---|---|
| [CONTROL] + [↑] [CONTROL] + [→] [CONTROL] + [↓] [CONTROL] + [←] | The arrow keys are used in conjunction with the [CONTROL] key. They allow you to move the cursor anywhere in the editor, to correct an error on a line for example. |
| [CONTROL] + [CLEAR] or [SHIFT] + [CLEAR] | Clears the screen and returns the cursor to "home" in the top left-hand corner. |
| [SHIFT] + [INSERT] | Inserts a new line |
| [SHIFT] + [DELETE BACK SPACE] | Deletes the current line |
| [CONTROL] + [1] | Momentarily interrupts the display of text scrolling on the screen. For example, with the Atari BASIC LIST instruction, to interrupt the scrolling of the program on the screen.For example, with the Atari DOS 2.5 "A. DISK DIRECTORY" menu option, to interrupt the scrolling of the content of the diskette. Press [CONTROL] + [1] again to resume normal scrolling. |
| [CONTROL] + [2] | Rings the buzzer. Not really essential, but if this listing shows only [CONTROL] + [1] and [CONTROL] + [3], you'll be wondering what [CONTROL] + [2] is for... |
| [CONTROL] + [3] | Produces an "End of file" character. For example, to create a small file quickly, under DOS 2.5, make a copy with the "C. COPY FILE" menu option from device "E:" (screen editor) to device "D1:MYFILE" (actual file on diskette). This works from and to any device. If the source is "E:", the screen editor, you will simply be asked to type a text in the editor. Type your text, and finish with [CONTROL] + [3]. Pressing [RETURN] will simply allow you to go to the next line, not finish typing your text. It is really [CONTROL] + [3] that will indicate that you are finished. |
| [Atari logo] or [Rectangle half black, half white] | On the Atari 400/800, the key represents an Atari logo. On all Atari XL/XE, the key represents a rectangle cut in half by a diagonal, half black, half white. In the editor, this key is used alternately to switch to "reversed video" or "normal" mode, and back. Note that on the Atari 400/800, it is sometimes used as a substitute for the [HELP] key — absent from the 400/800 — in some Atari software, such as Atari DOS 3. |
Essential Atari BASIC instructions
Here are some essential Atari BASIC instructions. This is by no means a tutorial on Atari BASIC. I invite you to read the Atari BASIC manuals if you are looking for a complete mastery of the subject. It is simply a selection of essential instructions, for those new to Atari computers.
| Atari BASIC instruction | Purpose |
|---|---|
GR.0 | The Atari BASIC does not have a CLS instruction. That's just the way it is, you have to make do.GR.0, the abbreviated version of GRAPHICS 0, allows you to switch to 40-column text mode (if you were in another graphics mode) and, above all, to clear the screen. In practice, it's the equivalent of CLS. |
END | The END instruction is very interesting to use in immediate execution mode. Using it will have absolutely no effect on the program in RAM memory. However, it immediately mutes the 4 audio channels and closes all open IOCB communication channels — including files open for writing, which will flush the buffer and close the files cleanly (updating the DOS directory record for this file and free sectors table). This is very useful if your program is stopped by an error, a STOP instruction or if you deliberately press the [BREAK] key. |
DOS | If the computer has been started with Atari BASIC and floppy disk drive #1 powered on, connected in the SIO chain, with a DOS diskette (preferably Atari DOS 2.5) inserted in the floppy disk drive #1, then the Atari BASIC DOS instruction will give control to DOS.In practice, it will display the DOS menu with options. This allows you to view the contents of diskettes, copy files, rename files, format diskettes, etc. With Atari DOS 2.5, the "B. RUN CARTRIDGE" menu option will return you to BASIC. |
BYE | With the Atari XL/XE, this instruction will launch the built-in "Self-Test" program, which will allow you to carry out hardware tests on the computer. With the Atari 400/800, this instruction will launch the "Memo Pad" program. Useful: BYE followed by pressing the [RESET] key is equivalent to powering off and on the computer, restarting the boot process. |
Where to start? — Hardware
It all depends on your budget and whether — or not — you're keen to buy modern equipment or vintage gear.
No Spending
Start by downloading an emulator and playing games within it. This is the best way to discover — without spending a penny — the graphical and audio superiority of Atari 8-bit computers over their contemporaries.
My recommendation: use Altirra.
Low Spending
Buy the modern recreation "Retro Games Atari The400 Mini". You'll enjoy playing all the games you fancy on a modern television (via HDMI), with the convenience of plugging in a USB stick (game storage) and USB joysticks — such as the new CX-40+ version.
Moderate Spending
With your Atari 8-bit computer, purchase two Atari CX-40 joysticks or other DB9 equivalent.
Warning: do not confuse the original CX-40, with 9-pin DB9 connector, to use with a vintage Atari computer...
... with their modern recreation CX-40+, with a USB connector, to use with The400 mini or your everyday computer.
Next, buy a modern device to load games you've previously downloaded:
- Either a peripheral that connects to the SIO port and emulates a floppy disk drive. Get a FujiNet or any "SIO-to-something".
- Or one of those modern cartridges that lets you copy a multitude of games onto it.
Copy a few games onto these devices and start playing.
My recommendation: buy an Atari 800XL + 2x Atari CX-40 joystick + a FujiNet (SIO port) or a SIDE3 cartridge (cartridge port).
You can also buy a few games in cartridge.
Higher Spending
Want to experience something as close as possible to what it felt like "playing the Atari" in the early 1980s?
With your Atari 8-bit computer, purchase two Atari CX-40 joysticks or other DB9 equivalent.
Warning: do not confuse the original CX-40, with 9-pin DB9 connector, to use with a vintage Atari computer...
... with their modern recreation CX-40+, with a USB connector, to use with The400 mini or your everyday computer.
Then, buy a cassette tape player/recorder and a floppy disk drive.
My recommendation: buy an Atari 800XL + 2x Atari CX-40 joystick + an Atari 1010 + an Atari 1050.
Then buy a few games on cartridge, cassette or diskette.
Where to start? — Software
This is naturally a very subjective area. I'd be more than happy to share my favourite games with you. You might enjoy them — or not. That doesn't mean they're bad games. It simply means you and I don't necessarily like the same kind of games.
This video, recorded using the Altirra emulator and played with a keyboard, offers a brief glimpse into my preferences. Naturally, certain games that require precision and speed will yield better scores with a proper joystick rather than a keyboard. And ideally, on a genuine Atari computer.
For the video: Altirra emulator, Atari 800XL, PAL, 1983 OS Rev. 2.
If you want names, my favourite list includes: Boulder Dash, Burger Time, Donkey Kong, Flip and Flop, Frogger, Fruity Pete, Galaxian, Gremlins, H.E.R.O., Millipede, Miner 2049er, Montezuma's Revenge, Mr. Do, Mr. Robot and his Robot Factory, Ms. Pac-Man, Nibbler, Ninja, Pac-Man, Pole Position, Q*Bert, Qix, Rainbow Walker, Zenji.
You will find all these games on the fantastic AtariMania web site.
Suggestions for optimal use
[Display] CRT "on" 2-3 minutes in advance to warm up
If the computer is connected to a CRT TV or monitor, it is a good idea to turn on this screen a few minutes before the computer, so that it has time to warm up and be ready when the computer produces an image for display.
[Display] Select appropriate video input
Before turning on the computer, check that the video input is correctly set on the TV or monitor.
[Display] Check volume level
Before turning on the computer, check the TV or monitor to make sure the volume is appropriate. Not muted so you can hear if anything is happening. Not too loud. If the audio is handled by a TV sound bar, an external amplifier with speakers, etc., high volume can be very unpleasant and dangerous for the installation and for your ears.
[Cartridge] Clean connectors
Before using a second-hand cartridge that you have just bought, gently clean the metal/golden contacts of the connector with a cotton swab soaked in a little IPA (Isopropyl Alcohol).
[Cassette tape] Check condition of the pressure pad
Reminder: Do not touch the magnetic surface with your fingers. Use a cotton swab for example to look under the magnetic tape (see below).
Look underneath the magnetic tape, where it is exposed for reading: in the middle of the cassette tape, where the playhead is supposed to read the tape. A foam pressure pad is hidden, behind the magnetic tape, to "push it" against the playback head. On some very old cassette tapes, this pressure pad has started to disintegrate and fall apart. Do not attempt to play the cassette tape in this condition. Transfer the magnetic tape to another case (shell). Or install a replacement pressure pad in good condition.
[Cassette tape] Stretch magnetic tape
If you need to play a cassette tape that has not been used for a very long time, it is certainly a good idea to re-stretch the tape before using it. Start by doing a FF (Fast-Forward) to go to the end of the tape. Then do a RWD (Rewind) to go back to the very beginning. The tape should not make any strange noises or jerk. Be very wary if the cassette tape is covered with dust or if it seems to have suffered from moisture or being dropped in water. Do not hesitate to repeat the operation (FF + RWD) if necessary. Reset the counter to 000, and you're all set.
[Diskette] Check condition before use
Reminder: Do not touch the magnetic surface with your fingers.
Do not use a diskette that has been bent, twisted, warped or otherwise obviously damaged. Check that the diskette rotates smoothly in its envelope. At the same time, check that no suspicious deposits are visible in the window showing the magnetic surface of the diskette. The surface should be even and smooth, with no suspicious deposits, stains, mould, etc.
Suggestions for optimal preservation
Store your equipment in a well-dry and temperate place, protected from excessive heat and humidity, and also protected from sunlight, moonlight, and any light, artificial light or UV-light sources. A room with stable conditions throughout the year is ideal. If possible, wrap your equipment in a sturdy, fully opaque cardboard box or plastic covering, shielding it from insects, dirt, dust, and any light sources.
Ensure that the keyboards have enough space around them and that no objects are pressing down on the keys. Why not place some plastic with large air bubbles over the keyboards for added protection?
Do not leave cassette tapes inside the cassette tape players/recorders. All cassettes must be fully rewound at the beginning of the tape, then placed in their protective plastic shells.
Do not leave floppy disks in the floppy disk drives. If you have a cardboard insert shaped like a floppy disk, insert it into the floppy disk drive and close the latch. All floppy disks should be in their protective paper sleeves.
Acid-free boxes or plastic containers with silica gel packets work well. Avoid foam padding that deteriorates and emits harmful chemicals over time.
Try to maintain an inventory in a spreadsheet with model, serial number, condition, mods, comments and location (i.e. "Room 2, Shelve A, Box 14"). Use archival-quality labels and backups for any software you use regularly. If like most of us, you're not in your prime youth, leave clear instructions and information about the value of this collection and what do to with it if...
Known issues
During the 1982-1983 period, Atari produced technical documents called "Tech Tip", generally quite short, intended for repairers (service centres), to help them solve clearly identified known issues. These "Tech Tip" documents are not a substitute for the famous "Field Service Manual", the very detailed technical bibles that are reference documents.
Please consult the Atari "Tech tip" documents in the knowledge base for all the details.
| Computer or Device | Tech tip |
|---|---|
| Atari 400/800 | Tech tip #2 (28 May 1982) ~ Atari 400/800; OS Rev. B Tech tip #10 (22 Feb 1983) ~ Atari 400/800; System lock-up Tech tip #11 (8 July 1983) ~ Atari 400/800; Video screen noise Tech tip #14 (7 June 1983) ~ Atari 400/800; Problem with Defender cartridge |
| Atari 800 | Tech tip #13 (22 June 1983) ~ Atari 800; Keyboard malfunction |
| Atari 410 | Tech tip #5 (17 Nov 1982) ~ Atari 410; #138, #140, and #143 Errors Tech tip #9 (9 Feb 1983) ~ Atari 410; #143 Errors |
| Atari 810 | Field Change Order #1 (28 May 1982) ~ Atari 810; Rear board Molex connectors removal Tech tip #1 (2 Apr 1982) ~ Atari 810; Rear board Molex connectors Tech tip #4 (17 Nov 1982) ~ Atari 810; Data separator board Tech tip #6 (17 Nov 1982) ~ Atari 810; Analog disk drive, data reliability Tech tip #7 (17 Nov 1982) ~ Atari 810; Preformatted diskettes Tech tip #16 (6 June 1983) ~ Atari 810; Issue with manufactured 1982 week 51, incorrect regulators Tech tip #17 (6 June 1983) ~ Atari 810; Analog disk drive, diode replacement Upgrade bulletin #3 (28 May 1982) ~ Atari 810; ROM, REV. C |
| Atari 820 | Tech tip #8 (17 Nov 1982) ~ Atari 820; Reset problem |
| Atari 1200XL | Tech tip #12 (16 June 1983) ~ Atari 1200XL; Loss of video sync Tech tip #15 (7 June 1983) ~ Atari 1200XL; Audio problem Tech tip #18 (12 July 1983) ~ Atari 1200XL; OS EPROMs, ROMs, REV. A, REV. B Tech tip #18A (29 Sept 1983) ~ Atari 1200XL; OS EPROMs, ROMs, REV. A, REV. B Tech tip #19 (15 Aug 1983) ~ Atari 1200XL; Problem with Star Raiders cartridge |
| Atari 600XL | Tech tip #20 (17 Aug 1983) ~ Atari 600XL; Issue with 24.000 first manufactured |
| Atari 1050 | Tech tip #21 (30 Sept 1983) ~ Atari 1050; Problems booting some non-Atari software |
Knowledge base article: KB-howto-0001-atari-8bit-golden-rules.
REV. 073.