CP/M?
Before the likes of MS-DOS/IBM PC DOS, MacOS, Windows, GEM, IBM OS/2, Linux, MacOS X, another Operating System was very popular for professional computers: CP/M.
CP/M was first released in 1974 by Digital Research. This Operating System could run on many computers from different manufacturers, provided they met common characteristics (CPU, etc). CP/M computers had access to an impressive catalogue of software. Many well-known software products started with their CP/M version. Aimed at the small business market, freelancers, scientists or senior company executives, CP/M was very popular from the mid 1970s to the mid 1980s.
(See the "Buying a computer in 1982" article in in the knowledge base for all the details).
FujiNet?
FujiNet is a multi-peripheral emulator and WiFi network device for vintage computers. The FujiNet project began as a simple WiFi modem for the Atari 8-Bit line of computers and quickly grew into a super peripheral emulating many devices including floppy disk drives, printers, cassette tape player/recorder, modem and the all new network device.
My personal opinion is that FujiNet and SIDE3 are now indispensable to all fans of Atari 8-bit computers. Voilà, That's it.
(Visit the official web site: https://fujinet.online)
Objective and requirements
The Atari's MOS 6502 CPU/microprocessor cannot run CP/M natively; CP/M requires a Zilog Z80 or an Intel 8080/85. However, the FujiNet chipset is powerful enough to run CP/M on an emulated Z80.
Therefore, FujiNet will run CP/M and the Atari computer will behave like a remote console connected to the CP/M computer via a pseudo-modem connection. In other words, FujiNet will run CP/M, all controlled by the Atari's keyboard and displayed on the Atari's video monitor.
All you need is a FujiNet (obviously), and some easy to find software. I've provided some links at the end of this article.
Step 1: set-up FujiNet
Mandatory:
- Update your FujiNet to the latest firmware
- Connect to the FujiNet web interface to check that:
- The modem is present
- The modem is activated
- In the root of the FujiNet MicroSD card, create the following folders structure{1} in capital letters/uppercase:
/CPM/A/0 - Unzip & Copy the contents of the CPM-A-0-folder.zip file with the system files on the FujiNet MicroSD card, obviously in the
/CPM/A/0folder
{1} The last folder is the number zero: CPM/Letter A/Number Zero
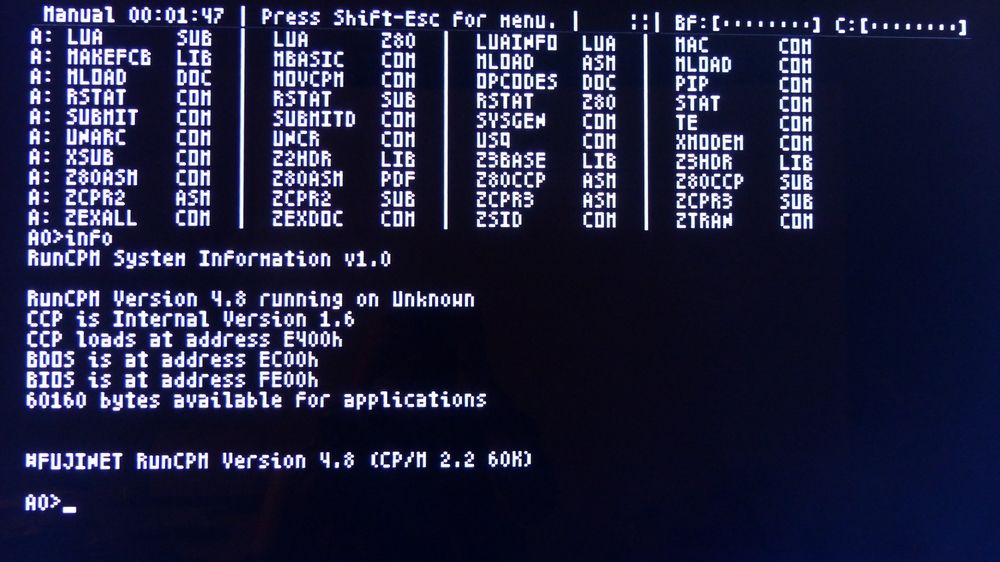
Nothing more to do on the FujiNet side. The RunCPM software/daemon is running and waiting for a command.
Optional:
If you want to add/mount "CP/M diskettes", just copy them to users 0..9 and to drives A..M:
/CPM/A/1,/CPM/A/2, ...,/CPM/A/9- ...
/CPM/M/0,/CPM/M/1,/CPM/M/2, ...,/CPM/M/9
Step 2: on the Atari
Proceed in this order:
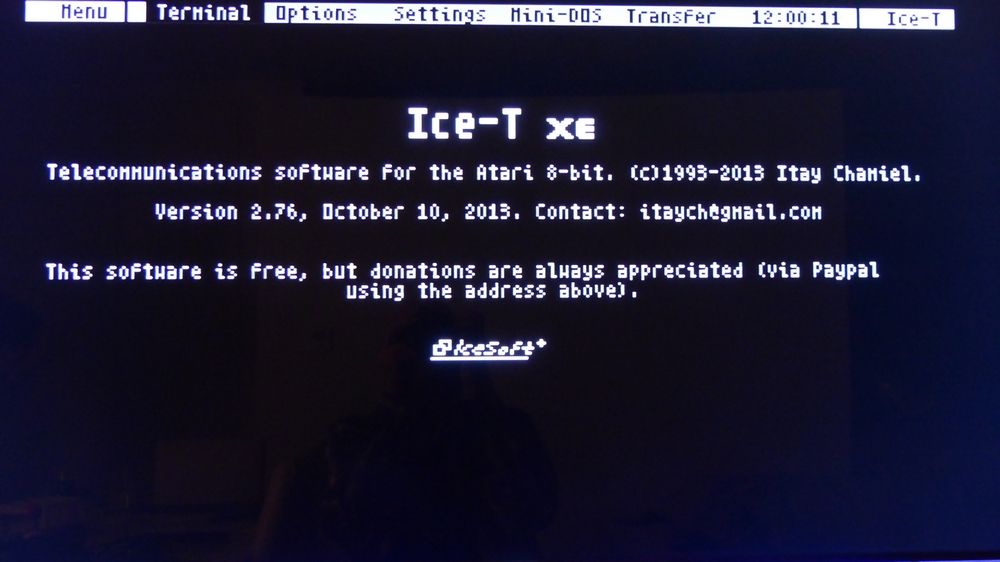
- Launch a Smart Terminal which preferably supports 80 columns
- Take, for example, ICE-T that you can download from https://atariage.com/forums/topic/217539-ice-t-xe-276-released
- Set FujiNet to boot from the ICE-T .atr software diskette
- Press "OPTION" for 5 seconds while you turn the Atari on, to disable the internal BASIC in the computers that have it
- MyDos starts but the R: driver is missing
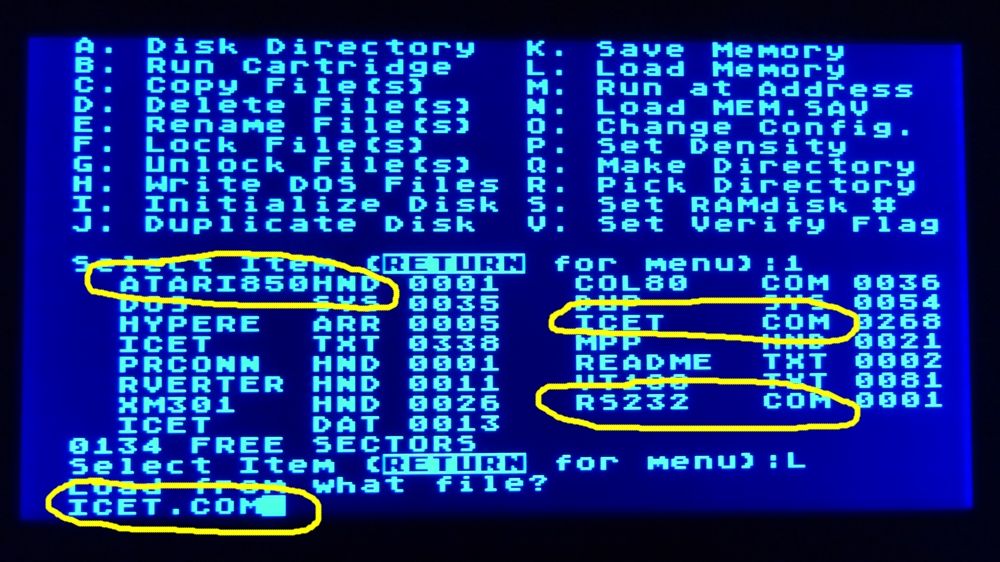
- Since FujiNet emulates an Atari 850 interface, copy (duplicate & rename) the "ATARI850.HND" file into "RS232.COM" in the same location as "ICET.COM"
- Launch
ICET.COM— it will launch "RS232.COM" automatically - Put the terminal in this mode: 9600,8,n,1
- Type
ATCPMand press "RETURN" - FujiNet reacts and sends the CP/M output to the screen: the A0> prompt appears!
Useful web sites & resources
Those sites will be useful if you start from scratch:
- Ice-T XE 2.76 released: https://atariage.com/forums/topic/217539-ice-t-xe-276-released
- Run the CP/M Operating System on Your Atari 8-Bit Computer using FujiNet and RunCPM: https://atariprojects.org/2021/01/31/run-the-cp-m-operating-system-on-your-atari-8-bit-computer-using-fujinet-and-runcpm-15-30-minutes
- FujiNet CP/M Support: https://github.com/FujiNetWIFI/fujinet-platformio/wiki/CP-M-Support
- RunCPM Software: https://github.com/MockbaTheBorg/RunCPM/blob/master/DISK/A.ZIP
- Huge collection of CP/M software: https://drive.google.com/drive/folders/11WIu8rD_7pIDaET7dqTeA73CvX0jkxz2
Screenshots
Special thanks to Jerome Delsarte for the technical information this article.
Knowledge base article: kb-hardware-0004-atari-8bit-digital-research-cpm-fujinet
REV. 008.